Earlier this year (2016) we had a wonderful holiday in the Hebrides. This included a trip to Isle of Harris, Harris Tweed in Tarbert, Harris. This is a two shop experience. The shop that interested me most what the one containing bolts of material- many bolts of material- and some yarn. We called early in out time on Harris to buy material for our two Ebay sourced chairs. These I planned to recover in Harris Tweed and we had chosen the material. This will be a winter project as the chairs are for our lounge which is currently being decorated ( by us). More about this later.
So on trip two I bought the 'Meadowsweet' skirt wool and some more grey based tweed. Both were single weaving width - 75cm. Fortunately I had the jumper with me to check the material would work.
Sample of the material

There are 4 colours in the warp and 4 in the weft, some are the same, some are similar - if the 'orange ' in the warp is a pure colour and the weft is based on this but ' 'heathered' - all very clever and worth taking the material apart to find out.
I planned to make another high waisted skirt similar to the one I made with my own woven wool material. However that was in 2012 and some modifications were needed.
I decided I would try to refit the skirt using a 'full hip adjustment'. This picture from Pinterest intrigued me!

This is not me but a diagram that makes clear what I mean - I hope!
So although this increased the hip measurement quite a lot I decided to give it a try. However as I can no longer obtain my pattern making fabric (Fabribaste) I stitched sheets of tracing paper together on the sewing machine! After back and front waist and hip measurements a new pattern was cut and a toile made.
This fitted well but as usual showed up that my two hips are quite different and I was able to adjust the pattern by taking in the 'bulge' on the right hand side. The dart length and position was much as in the previous skirt. Fitting in this way shows the advantage to making / adjusting a pattern to get a good fit.
I made the modification to the paper pattern to save any confusion and decided that I had to mark left and right side on the actual fabric and lining so as not to get confused!
Cutting out the fabric required great concentration and checking - ' check twice ( or three times) do once'! As the material is only 75 cm wide I had to cut one piece and then match to cut the other below it on the fabric. No room for error here!
The front and back are single pieces -no centre front to the fold here!

Notice the different colours of tailor tacks for the darts and position of the waist, hip etc. Getting the markings correct is not something to skimp over- experience teaches me this!

As with my black and red dogtooth skirt I decided to apply fine iron on interfacing to prevent any 'bagging' of the skirt. Unusually for me I decided to use a plain lining. I would back the high waist area with firmer interfacing and form the inner with some firm black linen, this means that the lining is attached just below the waist line. This custom tweak seems to work well.
Having stitched the darts, my next step is to insert the invisible zip. For many years I followed 'standard' practice and did this with an open right side seam. However I was never truly satisfied with the join up of the seam and the zip - my perfectionist streak showing here. A trawl through Google gave me an alternative method, insert the zip after the side seam is stitched. Detailed instructions were available. This gives me a much smoother finish at the base of the zip. Unfortunately I do not know the person who wrote this but the title is 'Invisble Zipper and lining'
This is the invisible zip. I like to leave a decent gap at the top of the zip- an opportunity to use a vintage hook and hand made 'eye'.

All went smoothly with the construction, however getting 4 belt loops which matched their position on the skirt and themselves took some concentration.
As in the red and black skirt I went for the minimum seams so left a slit pleat in the left hand seam below the zip. I added a button from my vintage button collection but finding one that was brown based was much more challenging than a black based one! This is interesting to me as getting brown dyes is easier than black dyes so I would have thought more brown based buttons were available. There is always something to think about, learn and research further.
On the final 'try on' I was really pleased with the look. The full hip adjustment was a real success and the back fitment ( I have a really hollow back) was good. However, it appeared that the front section of the side vent was longer than the back. The fabric at the back and front matched exactly at the lower hem level and where they left the button so this was a puzzle. I had checked the position of the bottom really carefully as I mitred the side vent and bottom hem junctions. So I needed to sleep on this and work out what had gone wrong in the construction. We are talking less than 5 mm here but to a sewer's eye this IS noticeable.
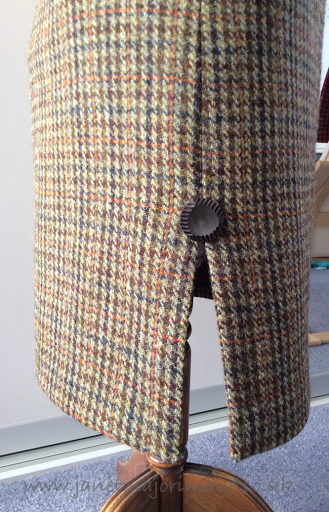
On sleeping on this all I could think was the beating down of the fabric during the weaving was not exactly the same. So I would try to correct it with steaming and a good tug on one and ease up on the other side. This did the trick.
The finished skirt - I will try and get a picture of me wearing it ( which looks even better)

With the meadowsweet jumper ( minus the belt! )

Fascinating - had no idea there was even such a thing as a full hip adjustment, suspect I might have needed it before I got my back fixed as I stood oddly. Something to bear in mind for my next skirt! Jealous of your trip, too! :)
ReplyDelete